How to create a WebSocket server in dotnet
An introduction to web sockets in with dotnet
In What are WebSockets we covered the fundamental basics relating to WebSockets and how they can be used to enable Real-Time bidirectional communication between client and server applications.
WebSockets provide a number of significant advantages to help implement Real-Time communication in applications, they do require specific server side support and your service application needs to support the WebSocket protocol.
Dotnet is packaged with a number of improvements and enhancements in the Networking Operations API surface and provides
improved capabilities and performance of the existing HTTP and WebSockets protocols. WebSockets are now supported over
HTTP/2, their handshake response information is exposed in the CollectHttpResponseDetails setting of the
ClientWebSocketsOptions class and HTTP upgrade requests over WebSockets allow for the passing of a custom HttpClient
instead of the one encapsulated in the request.
How to start a new Websocket project
tutorials
All code samples, examples and projects for all Threenine articles and tutorials for the threenine.blog
threenine/tutorialsIn order to demonstrate a very simple websocket application we'll build simple notification application, to send messages. We'll first start off by creating our websocket server.
To do this we'll first create a solution file and then create and add a basic Web API project to it.
dotnet new sln --name server
dotnet new webapi --name server --output src
dotnet sln Server.sln add src/server.csproj
Configure the application start up
We selected the Web Api project template primarily because it is mostly configured for a web based project because
the *.csproj is configured to make use of Microsoft.NET.Sdk.Webwhich contains all the middleware and functionality
we will need.
Once our project has been created we will then need to clear out all the junk that has been pre-populated in the
Program.cs file and simply replace it with the following code.
var builder = WebApplication.CreateBuilder(args);
var app = builder.Build();
app.UseWebSockets();
app.Run();
The key line in the code is the app.UseWebSockets() which adds the WebSockets middleware to the request pipeline,
this enables accepting WebSocket requests by adding a IHttpWebSocketFeature to the HttpContext if the request is
a valid WebSocket request.
Write a custom Notifier class
For our simple Notification utility we will implement a Notification class with Handle method to process whatever we receive. What we'll do is configure a Buffer as storage location to receive any data from the WebSocket connection asynchronously.
The Handle method manages the process of receiving and sending messages via WebSocket connection. It takes a WebSocket object ws as an argument. async denotes that this method contains asynchronous operations that return a task representing the ongoing operation.
var buffer = new byte[1024 * 4]; initializes a byte array buffer with a size of 4096 bytes (1024 * 4) to hold
incoming data from the WebSocket client.
ReceiveAsync is an asynchronous method that receives data from the WebSocket into the buffer. It returns an instance of
WebSocketReceiveResult. The await keyword is used to pause the execution of the method until the ReceiveAsync
operation completes.
We initiate a loop that continues as long as the WebSocket's CloseStatus is null, inferring that the connection is
still open.
Inside the loop, the server sends back the message it just received. ws.SendAsync is used to send data to the WebSocket client
Once the data has been received we will immediately send it on again to whichever client it connected to the websocket.
The loop repeats as long as the client continues to send messages without closing the connection.
After the client closes the connection, the server also closes from its side using the CloseAsync method of the
WebSocket ws object. This method is provided with the status of the reason for closing (obtained from the client)
and a cancellation token.
This method is typically used in a WebSocket-enabled Server to handle bidirectional communication that a WebSocket connection offers. Reception and transmission of messages are covered within this method.
public class Notifier
{
    public async Task Handle(WebSocket ws)
    {
        var buffer = new byte[1024 * 4];
        var receiveResult = await ws.ReceiveAsync(
            new ArraySegment<byte>(buffer), CancellationToken.None);

        while (!receiveResult.CloseStatus.HasValue)
        {
            await ws.SendAsync(
                new ArraySegment<byte>(buffer, 0, receiveResult.Count),
                receiveResult.MessageType,
                receiveResult.EndOfMessage,
                CancellationToken.None);

            receiveResult = await ws.ReceiveAsync(
                new ArraySegment<byte>(buffer), CancellationToken.None);
        }
        await ws.CloseAsync(
            receiveResult.CloseStatus.Value,
            receiveResult.CloseStatusDescription,
            CancellationToken.None);
    }
}
Implement websocket controller
Once we have completed our Notifier, we can turn our attention to writing our Controller. Although you can also implement this making use of Minimal API, we'll implement making use of the typical dotnet based controller.
The code will check if the incoming HTTP request is a WebSocket request (HttpContext.WebSockets.IsWebSocketRequest).
If it is a WebSocket request:
- Accept the WebSocket connection
(await HttpContext.WebSockets.AcceptWebSocketAsync()). - Hands over the accepted WebSocket to the Handle method of the notifier object. The Handle method, defined in the Notifier class, handles the incoming WebSocket messages in a loop until the WebSocket is closed from the other end. Messages received are echoed back to the client, real-time.
If it is not a WebSocket request:
- It sets the HTTP response status code to 400 Bad Request.
public class WebSocketController(Notifier notifier) : ControllerBase
{
    [Route("/")]
    public async Task Get()
    {
        if (HttpContext.WebSockets.IsWebSocketRequest)
        {
            using var webSocket = await HttpContext.WebSockets.AcceptWebSocketAsync();
            await notifier.Handle(webSocket);
        }
        else
        {
            HttpContext.Response.StatusCode = StatusCodes.Status400BadRequest;
        }
    }
}
Update the application startup
We can then update our Program.csto create an HTTP server that supports WebSockets, using the main ASP.NET Core
building blocks and .NET's built-in Dependency Injection.
Here is a line-by-line explanation:
var builder = WebApplication.CreateBuilder(args);
The WebApplication.CreateBuilder(args) is a static method that's used to create and configure a builder object for
a WebApplication. The created builder is used to configure services for the application and build the web application
host.
builder.Services.AddControllers(); adds services required for the MVC framework to the application's services,
specifically Controllers.
builder.Services.AddSingleton<Notifier>(); statement is setting up a dependency injection for the Notifier class.
Specifically, it's telling the framework to create a single instance of Notifier for when any component of the
application requires it.
var app = builder.Build(); builds the WebApplication using the configurations provided and returns a WebApplication object.
app.UseWebSockets(); The middleware that enables the ability to service WebSocket requests. WebSockets allows
real-time, two-way communications between a client (like a browser) and a host server.
app.MapControllers(); is an endpoint routing middleware that maps HTTP request routes to the matching action methods
in the controllers.
app.Run(); starts the application and begins listening for HTTP requests.
The Notifier class code represents an implementation of a class that allows a WebSocket server to handle and respond to messages from a WebSocket client. It reads the incoming messages in a continuous loop and echoes them back to the client until the client disconnects.
The Handle method in the Notifier class is implemented asynchronously, providing the standard pattern for handling requests and responses via WebSockets in ASP.NET Core.
var builder = WebApplication.CreateBuilder(args);
builder.Services.AddControllers();
builder.Services.AddSingleton<Notifier>();

var app = builder.Build();
app.UseWebSockets();
app.MapControllers();

app.Run();
Test the websocket
All the development we need to implement a websocket is now complete, we can now get ready to test our websocket.
we generally make use of Jetbrains IDE for all our development work, irrespective of language or platform and for dotnet based development we make use of Jetbrains Rider. One of the many reasons why we do this is because of all the great tools that are built directly into the IDE and ready to use. One of these tools is the built-in support for HTTP Client, this feature enables you to create, edit, and execute HTTP requests directly in the JetBrains Rider code editor.
We are going to use the feature to create a tests for our websocket. The way we typically do this is to add an Integration test project to our solution.
dotnet new xunit --name Integration --output tests/integration
dotnet sln dotnet sln Server.sln add tests/integration/Integration.csproj
This will add a unit test project to our solution, for our immediate purposes we are not going to use the xunit test
functionality, so you can go ahead and delete the GlobalUsings.cs and UnitTest1.cs files because we won't be
needing them.
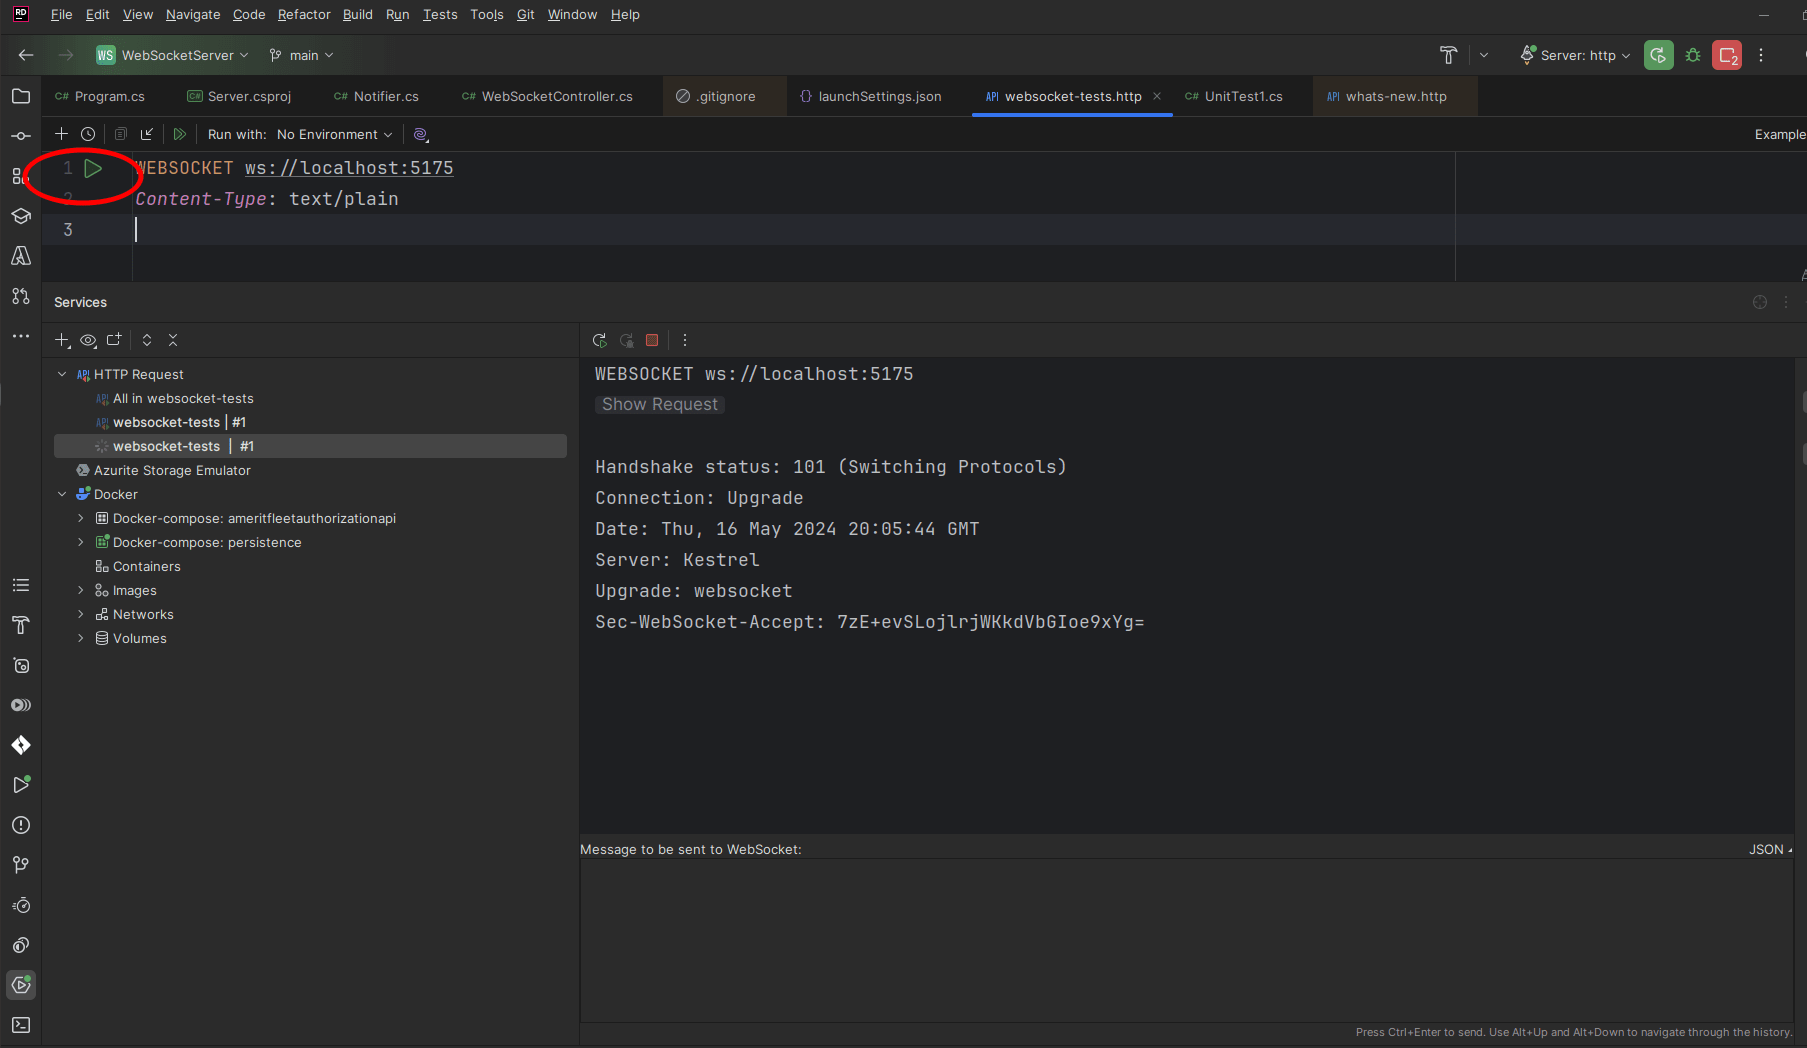
We can now add a Http Request file then you can add the following code that uses an HTTP request code for a WebSocket connection to the server.
This line of the code indicates the use of the WebSocket protocol to open a two-way interactive communication session
between the user's browser and a server, with ws://localhost:5175 being the address of the server. WebSocket works over
HTTP ports 80 and 443 as well as to support HTTP proxies and intermediaries.
The Content-Type header is used to indicate the media type of the resource. application/json means that the content of
the transmitted data in the WebSocket will be in JSON format.
WEBSOCKET ws://localhost:5175
Content-Type: text/plain
A full in depth discussion on how to write fully functioning websocket tests with the HTTP Requests, is beyond the scope of this tutorial, and Jetbrains a great resource to help you get started
We can now start our project, and when it's all running we can navigate to the file in our IDE and click the green arrow to connect to our Websocket. We should see the connection happen and the confirmation in the window.
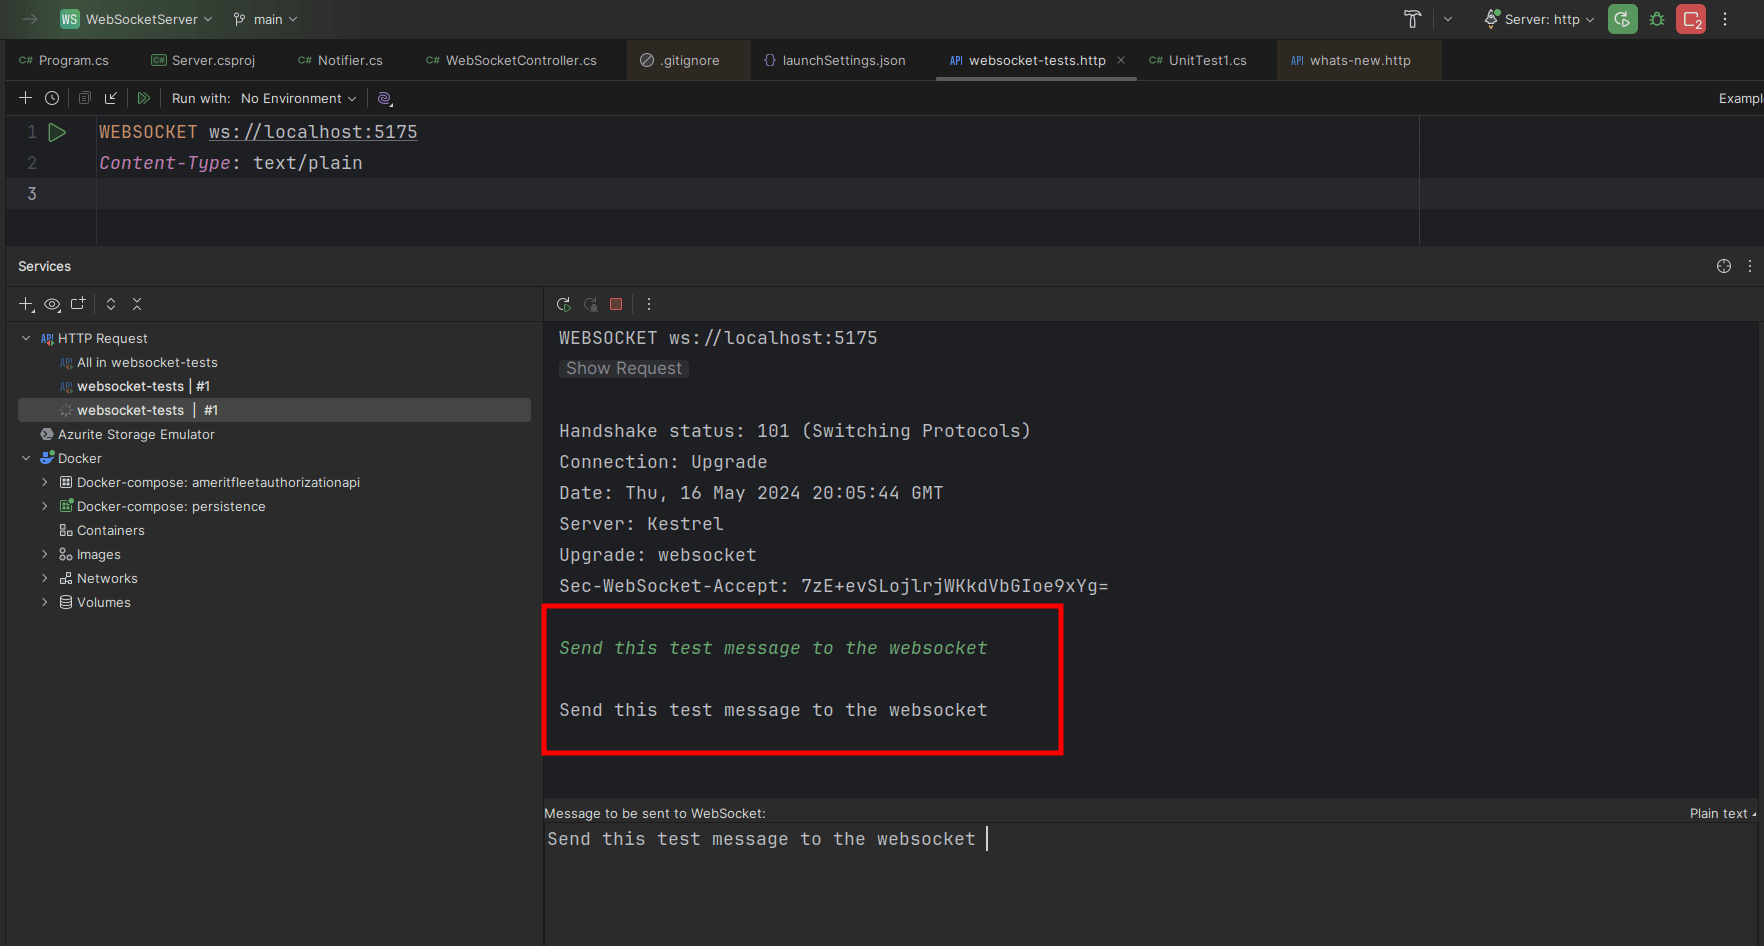
With the connection established, we can now interact with our websocket by typing in the Message to be sent to Websocket
box and pressing Ctrl + Enter to send it. We should see the socket receive and then automatically resend the message.
Conclusion
If you have followed along with this post, you should have a basis of a functioning websocket server up and running, there is a lot more you can do and a few more configuration options you can configure for the websocket, but you have the basic all configured for you to continue developing.
An introductory guide to API Development
threenine.co.uk cover introductory concept, terminologies & technologies related to API development in order to gain a basic understanding.
What are Web Sockets
WebSockets are a bi-directional, full duplex communications protocol initiated over HTTP. They are commonly used in modern web applications for streaming data and other asynchronous traffic.


